AWS Cloud9へのSSM SSH接続をVS Codeで行う
Cloud9にSSMを利用したSSH接続をVS CODEで利用する
前提条件
接続までの簡単な手順
- AWS CLIとSession Manager プラグインのインストール
- IAMからアクセスキーの作成
- AWS CLIの設定
- SSM経由で接続できるようにIAMロール作成
- Cloud9の環境を作成
- Cloud9のインスタンスにIAMロールを付与
- Cloud9でSSH接続用の鍵を作成
- VSCODEをCloud9へ接続
1. AWS CLIとSession Manager プラグインのインストール
- AWS CLIをインストール
AWS CLIのインストールガイド - Session Manager プラグインをインストール
Session Manager プラグインのインストールガイド
2. IAMからアクセスキーの作成
- IAM → ユーザーを選択し、aws cli(Cloud9)を利用するユーザを選択して、アクセスキーを作成を押下
!
- ユースケースから「コマンドラインインターフェイス(CLI)」を選択、チェックをして次へを押下

- 次の画面は必要であれば入力して、アクセスキーを作成を押下
- アクセ士キーが作成されたら以下の画面が表示されるのでアクセスキーとシークレットキーをメモして、完了を押下

3. AWS CLIの設定
- コマンププロンプトを新しく開く
- aws configureを入力すると入力プロンプトが現れるので以下の順で入力する
(入力後はアクセスキーとシークレットキーはもう不要なのでメモは破棄しておくこと)- アクセスキー
- シークレットキー
- デフォルトリージョン(入力しなくても可)
- デフォルトフォーマット(入力しなくても可)

4. SSM経由で接続できるようにIAMロール作成
- IAMロール作成画面を開いてAWSのサービスとユースケースからEC2を選択して次へを押下する

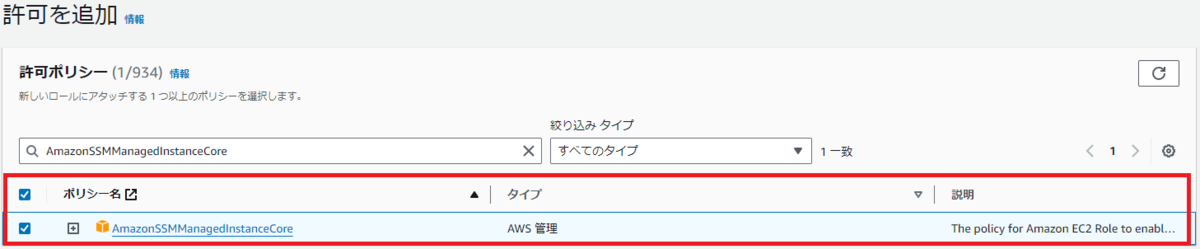
- Cloud9にSSM経由で接続するにはIAMポリシーのAmazonSSMManagedInstanceCoreになるので選択する。
- ロールの詳細のロール名に後で見た時にわかりやすい任意の名称をつける

- 作成を押下
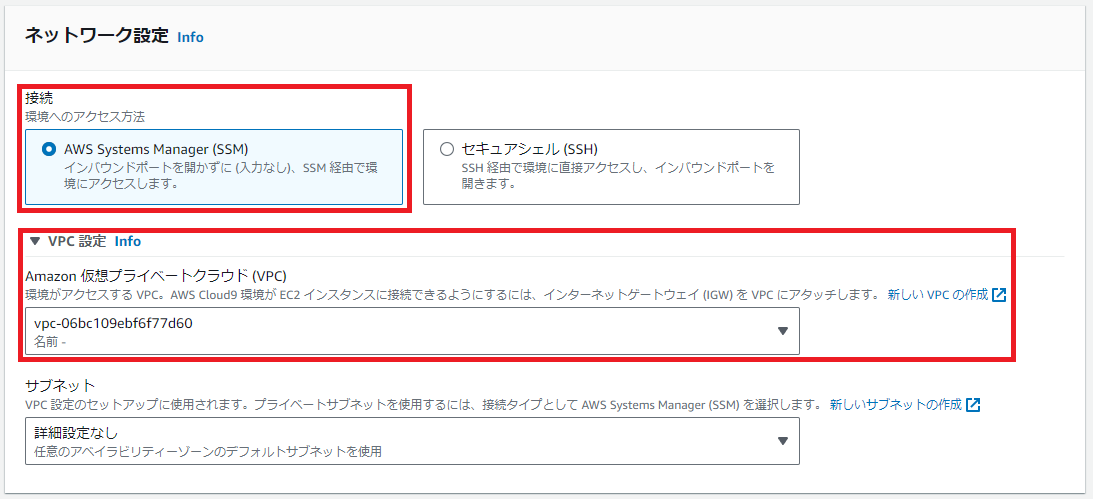
5. Cloud9の環境を作成

6. Cloud9のインスタンスにIAMロールを付与
- EC2を開いて先程作せいしたCloud9のインスタンスを選択(EC2は動いていても停止していても問題ありません)

- アクション→セキュリティ→IAMロールを変更を押下

7. Cloud9でSSH接続用の鍵を作成
- Cloud9を開いて先程作成した環境を選択し、Cloud9の環境を開く
- 暫く待つとCloud9上でIDEが起動してくるのでターミナルを選択
- ターミナルで以下の手順でコマンドを実行
- Cloud9のIDE上に
id_ecdsaというファイルが現れるのでローカルにダウンロードする ダウンロードした
id_ecdsaを%HOMEPATH%/.sshの配下に移動する.sshの下にconfigというファイルを作成するconfigを開いて以下の内容で作成する(HostNameの所は自身が作成したEC2のインスタンスIDを入れること)
# Read more about SSH config files: https://linux.die.net/man/5/ssh_config Host Cloud9 HostName EC2のインスタンスID User ec2-user ProxyCommand C:\Program Files\Amazon\AWSCLIV2\aws ssm start-session --target %h --document-name AWS-StartSSHSession --parameters portNumber=%p IdentityFile ~/.ssh/id_ecdsa IdentitiesOnly yesコマンドプロンプトからSSM経由でCloud9への接続テストをする
ssh Cloud9←.ssh/configに設定したHost名と同じものを指定すること(大文字、小文字を間違わないように)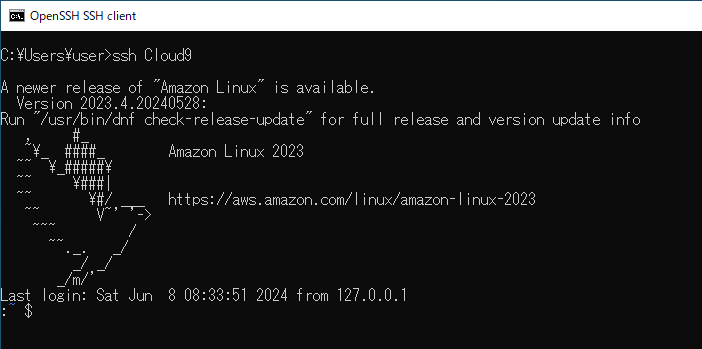
- 上記のように表示されたらログインできている
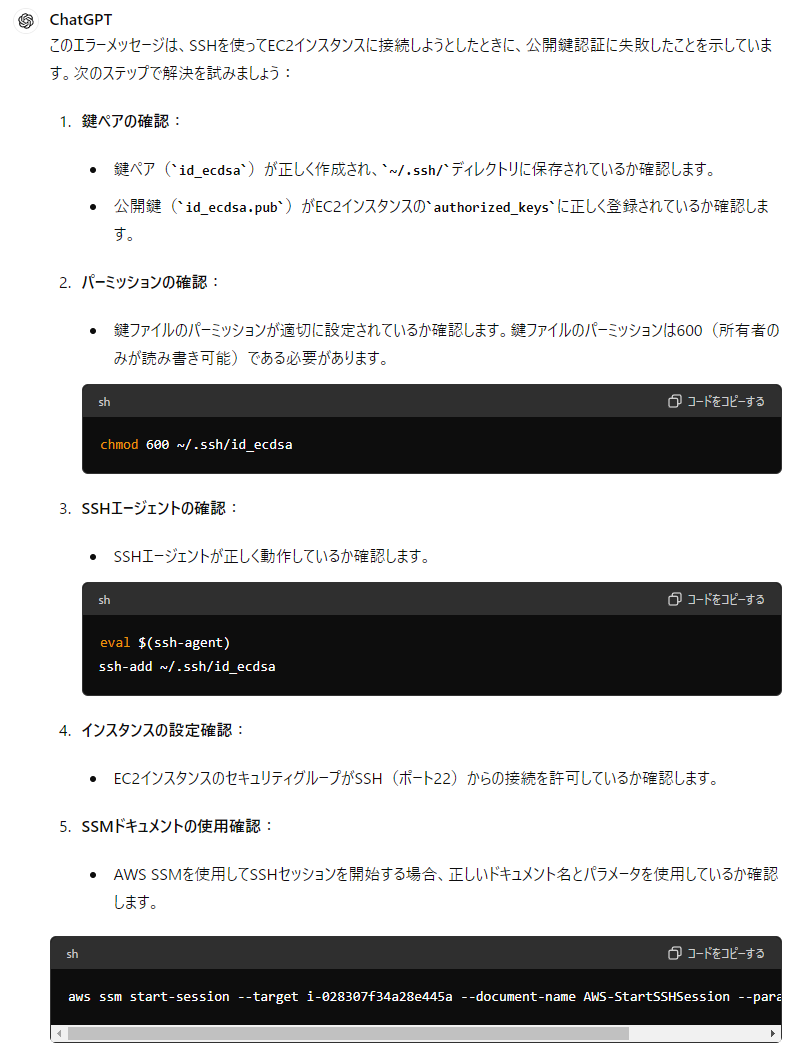
うまく接続できない時
エラーの例.ssh/authorized_keysにid_ecdsa.pubの登録を忘れた場合
エラーメッセージをChatGPTにそのまま渡すと良い
C:\Users\user>ssh Cloud9 -v
OpenSSH_for_Windows_8.1p1, LibreSSL 3.0.2
debug1: Reading configuration data C:\\Users\\user/.ssh/config
debug1: C:\\Users\\user/.ssh/config line 2: Applying options for Cloud9
debug1: Executing proxy command: exec C:\\Program Files\\Amazon\\AWSCLIV2\\aws ssm start-session --target i-028307f34a28e445a --document-name AWS-StartSSHSession --parameters portNumber=22
debug1: identity file C:\\Users\\user/.ssh/id_ecdsa type -1
debug1: identity file C:\\Users\\user/.ssh/id_ecdsa-cert type -1
debug1: Local version string SSH-2.0-OpenSSH_for_Windows_8.1
debug1: kex_exchange_identification: banner line 0:
debug1: kex_exchange_identification: banner line 1: Starting session with SessionId: user-xtlf33bbvaqe45yltjf3c4xqwy
debug1: Remote protocol version 2.0, remote software version OpenSSH_8.7
debug1: match: OpenSSH_8.7 pat OpenSSH* compat 0x04000000
debug1: Authenticating to i-028307f34a28e445a:22 as 'ec2-user'
debug1: SSH2_MSG_KEXINIT sent
debug1: SSH2_MSG_KEXINIT received
debug1: kex: algorithm: curve25519-sha256
debug1: kex: host key algorithm: ecdsa-sha2-nistp256
debug1: kex: server->client cipher: chacha20-poly1305@openssh.com MAC: <implicit> compression: none
debug1: kex: client->server cipher: chacha20-poly1305@openssh.com MAC: <implicit> compression: none
debug1: expecting SSH2_MSG_KEX_ECDH_REPLY
debug1: Server host key: ecdsa-sha2-nistp256 SHA256:7irz3qmDiW6T/epT/sMrF6A81V1Ol7EIdt6K99dMYjQ
debug1: Host 'i-028307f34a28e445a' is known and matches the ECDSA host key.
debug1: Found key in C:\\Users\\user/.ssh/known_hosts:1
debug1: rekey out after 134217728 blocks
debug1: SSH2_MSG_NEWKEYS sent
debug1: expecting SSH2_MSG_NEWKEYS
debug1: SSH2_MSG_NEWKEYS received
debug1: rekey in after 134217728 blocks
debug1: pubkey_prepare: ssh_get_authentication_socket: No such file or directory
debug1: Will attempt key: C:\\Users\\user/.ssh/id_ecdsa  explicit
debug1: SSH2_MSG_EXT_INFO received
debug1: kex_input_ext_info: server-sig-algs=<ssh-ed25519,sk-ssh-ed25519@openssh.com,ssh-rsa,rsa-sha2-256,rsa-sha2-512,ssh-dss,ecdsa-sha2-nistp256,ecdsa-sha2-nistp384,ecdsa-sha2-nistp521,sk-ecdsa-sha2-nistp256@openssh.com,webauthn-sk-ecdsa-sha2-nistp256@openssh.com>
debug1: SSH2_MSG_SERVICE_ACCEPT received
debug1: Authentications that can continue: publickey,gssapi-keyex,gssapi-with-mic
debug1: Next authentication method: publickey
debug1: Trying private key: C:\\Users\\user/.ssh/id_ecdsa
debug1: Authentications that can continue: publickey,gssapi-keyex,gssapi-with-mic
debug1: No more authentication methods to try.
ec2-user@i-028307f34a28e445a: Permission denied (publickey,gssapi-keyex,gssapi-with-mic).

C:\Users\user>
正しく回答してくれている